The bathroom is done. Yay! For a small room, it ended up consuming way more of my time then it should have. But at last, it is done. And it doesn’t look half-bad, now that all’s said and done – despite my lament about harvest gold walls. (It’s more yellow than this picture shows, but as you can see, not as gold as the toilet.)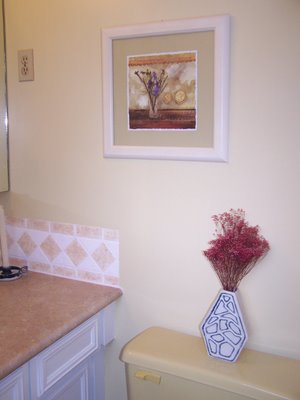
And now, because you have all been so patient and understanding during my recent whiny posts, I give you… Decorating on a Dime – How to re-do your bathroom for less than it costs to fill your tank with gas. Trust me, though, I didn’t look like THESE renovation experts while I did it. What’s with those high-heeled work boots? Nope, my decorating clothing of choice is a twenty-year-old t-shirt with about seventeen layers of paint, and a pair of shorts that used to fit me – back before I had children!
1. Paint – as I mentioned before, if you’re not too fussy about the colour and don’t need more than one gallon, you can often find really good deals in the mis-tints shelves at your local hardware store. I also frequent Habitat Re-Store, the local store that sells second-hand building supplies in support of Habitat for Humanity. I got a $35 bucket of paint for $15.
2. Curtains – First of all, do what I did and root around in your basement. If you’re anything like me, you might have a cupboard full of fabric that you’ve bought over the years but never got around to using, and even a curtain rod left over from an old project. So the curtains cost us nothing. But even if I’d had to buy fabric, I would have checked the discount racks at the local fabric store. For a small window, it’s pretty easy to make curtains for $10. The only thing I had to buy was the funky pull-backs I got for $7.99 at JYSK. (Sorry – I tried to up-load a picture, but apparently Blogger only wants me to put one of them on this post.)
3. Countertop and sink – once again, before you go and spend big bucks for a counter top and fixtures, check second-hand places or look in the seconds rack at the hardware store. Our countertop cost only $65 at Habitat Re-Store. The sink cost us nothing as it was also hanging out in our basement (the former owners of the house left it behind). We just bought a cheap set of taps for $25.
4. Vanity – Instead of buying a new vanity to replace the very tired-looking oak cabinet in the bathroom, I just painted over it with fresh white paint. Voila! Looks like brand new! Make sure you use a good base coat and durable top-coat because it can get a little banged up over time.
5. Faux tile backsplash – This is my favourite tip for a cheap but attractive addition to the room. Because there was a backsplash on the old countertop, and it was hard to patch up the wall where the glue had been, I couldn’t just paint it. Instead, I did a faux tile thing like I’ve done in the kitchen in the past. It’s pretty simple. First you put on a base coat, then you tape in the “grout” with thin painter’s tape. Trowel on the plaster in a thin layer, and while the plaster is still wet, remove the tape. (It helps if you have a partner who can remove the tape while you plaster, because the plaster dries pretty quickly.) Once the plaster is dry, paint it with a sealing coat, and then you can sponge on top of that for a nice Tuscan villa look. It’s hard to make the tiles look smooth, but if you don’t mind the rough look (which I find quite appealing personally) it turns out quite nicely.
And there you have it. Heather’s feeble attempt to redeem her vacation by at least finishing a home decorationg project.